I’ve seen numerous posts on different discussion boards posted by new Mac users wanting to learn to write code for the Mac. The main complaint is that Interface Builder is too different from the existing documentation, including Aaron Hillegass’s excellent Cocoa Programming for Mac OS X (which actually remains very relevant, by the way. You can wait for some updated books to come out, but Aaron’s book still provides a lot of concepts and even methods that apply. You just need to know what’s changed in XCode 3 and Objective-C 2). So, I’m going to do a quick tutorial here. FULL DISCLOSURE: I learned this from Marcus Zarra, so credit where credit is due. ;-)
Here are some points that you should keep in mind before moving ahead:
- Don’t use Interface Builder to generate code. Create your code in XCode and let Interface Builder work with it. This isn’t absolutely necessary, but as Marcus told me, it’s just easier to get in this habit as the XCode 2 method of creating your controller, instantiating it, and generating your code files from Interface Builder simply isn’t available in the same way in XCode 3.0. I’ve come to see what Marcus is saying. It makes sense, but you’ll have to get into the process yourself to fully understand it. We’ll get to that in a minute.
- Understanding Cocoa programming is much simpler if you learn MVC. You can probably step through code examples and figure some things out without learning MVC (Model, View, Controller), but I wouldn’t recommend it. Go Google it and read up on it.I will say as an introduction to it for those who are not familiar that it should probably be called (Model <–> Controller <–> View) or (View <–> Controller <–> Model) as the controller always sits between the other two. Your controller is either telling your model to update its data or it is telling the view to update its display. That’s the crux of the whole paradigm. The details run much deeper, but that’s how I would nutshell it for you.
Create Your Application
Let’s get started. Create a Cocoa Application using the following steps:
- Select File > New Project… and choose Cocoa Application in the ensuing dialog. Click Next
- Enter ‘FirstApp’ as the project name. Click Finish
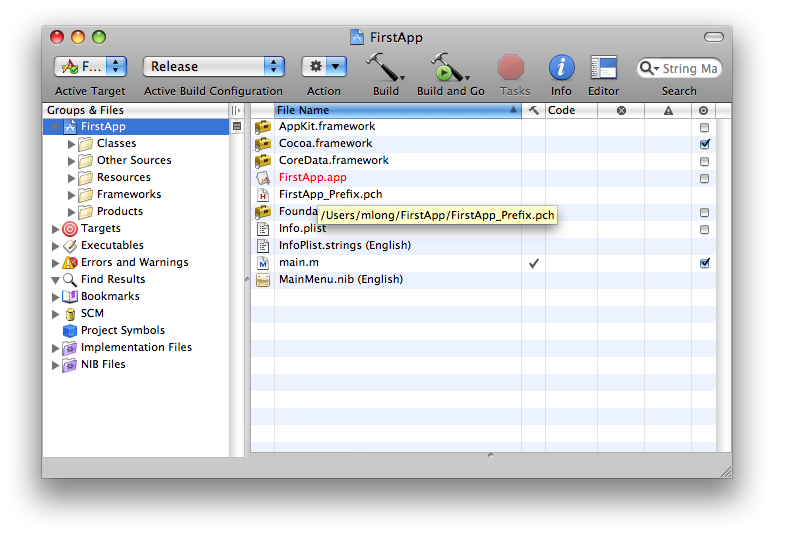
You should see a project workspace like the following:
The next thing you should do is create a class to act as your controller or delegate.
Delegate == Controller
The words delegate and controller can be used synonymously. You’ll see later that we delegate the work of the different controls we create in Interface Builder to a delegate or controller class. This should all make perfect sense momentarily. First, create your controller/delegate class using the following steps:
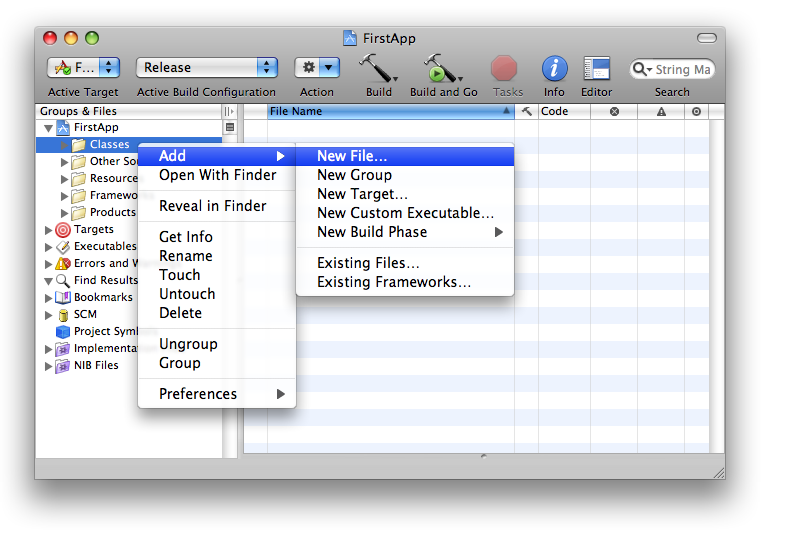
- Option-Click on the Classes folder in your workspace and select ‘Add File…’

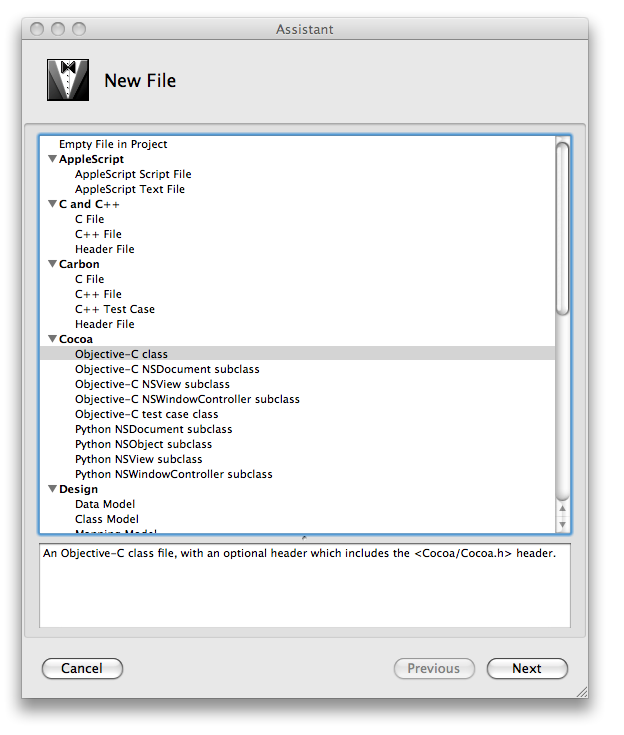
- Choose Object-C Class in the ensuing dialog and click Next

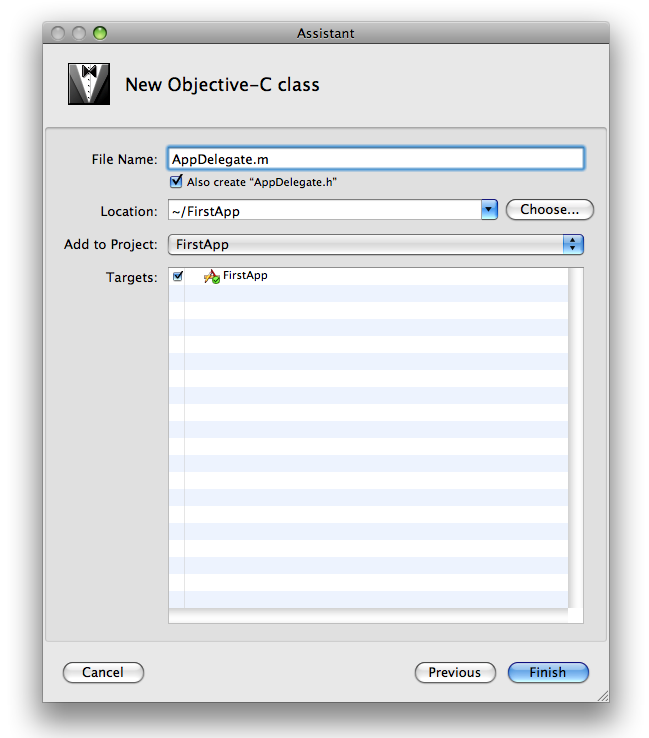
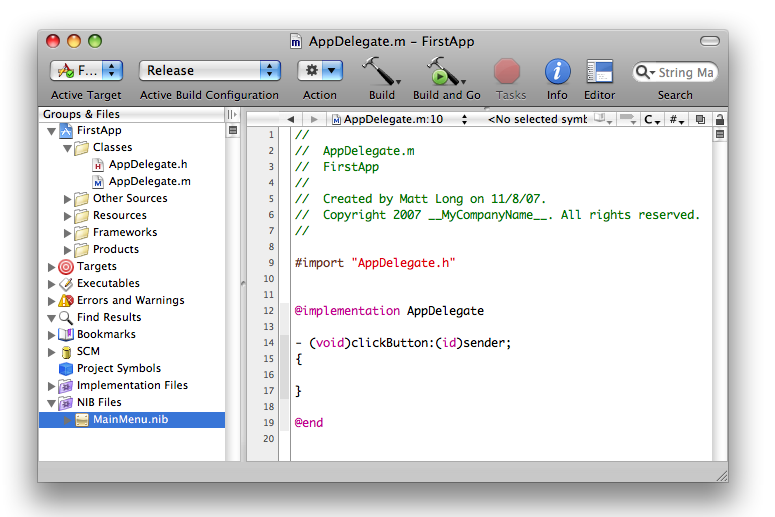
- Name the file ‘AppDelegate.m’ and click Finish

- A new code window will display with your ‘AppDelegate’ interface code (.h file). Add an outlet for a text field and a label, and an action to the code so that it looks like this:
@interface AppDelegate : NSObject { IBOutlet NSTextField *textField; IBOutlet NSTextField *label; } - (IBAction)clickButton:(id)sender; @end - Now switch over to your implementation file for ‘AppDelegate’ (.m file). Add the clickButton implementation code so that the file looks like this:
@implementation AppDelegate

- (void)clickButton:(id)sender;
{

}

@end
We will actually add some code to do something in the clickButton handler, but first we need to hook it up to the user interface in Interface Builder.
Interface Builder And Controller/Delegate Implementation
Now that you’ve specified the outlets–two NSTextFields, one a text field and one a label in this case–and an action called clickButton, you will see these items available for connecting to the UI in Interface builder. Let’s open Interface Builder and make the connections we need using the following steps:
- In your XCode workspace, expand the folder in the tree view called NIB Files and double click the file called ‘MainMenu.nib’. This will open the nib file in Interface Builder

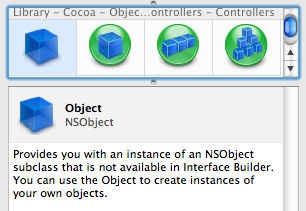
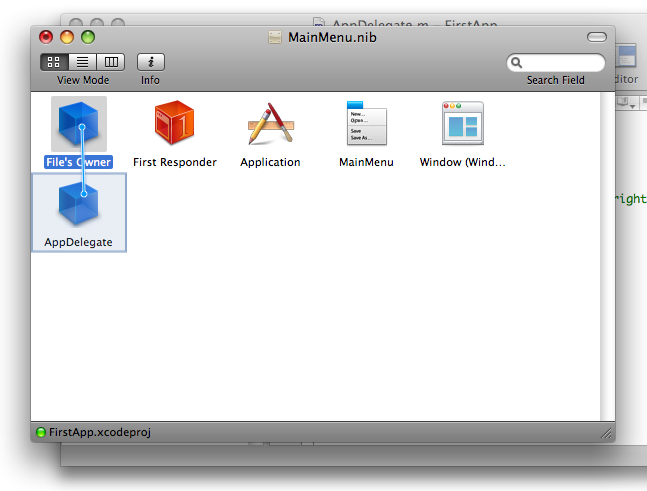
- Once Interface Builder loads select the NSObject item and drag it into the ‘MainMenu.nib’ window.
Then rename it to ‘AppDelegate’

Making Connections (Pay Attention Here)
These next two steps are critical for your understanding. You now need to tell Interface Builder the following:
- What object you want to use as a File’s Owner. You will delegate actions to a delegate/controller object. You tell the application which object to use by setting the File’s Owner delegate.
- What type of object this delegate is. Before you can specify which object to use as the File’s Owner you have to set the object type. A regular NSObject doesn’t provide any implementation for your app. You need to tell Interface Builder that you want your NSOBject to actually be an object of type ‘AppDelegate’.
You can achieve this by completing the following steps:
- If you haven’t already, open the Inspector in Interface Builder by selecting Tools > Inspector
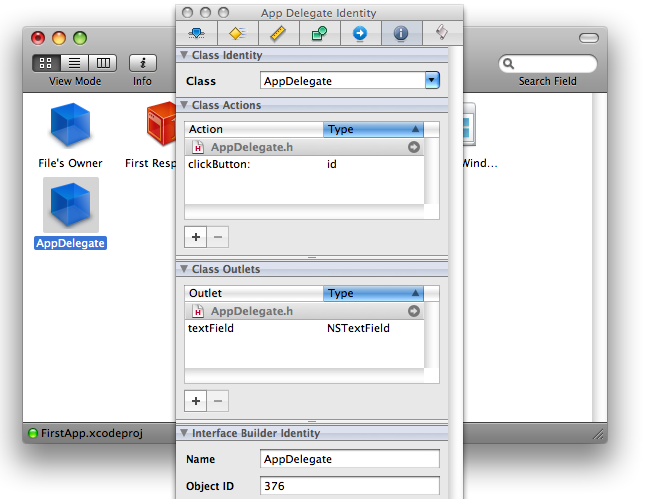
- Click on your NSObject that you named ‘AppDelegate’ and then click on the Identity tab in the inspector.
- Change the class to type ‘AppDelegate’ which will be available in Interface Builder as it has been able to obtain the class information from XCode.

You should also notice at this point in the Class Actions and Class Outlets sections of the Inspector, your action, clickButton: and your outlet, the NSTextField are now visible. We’ll hook those up in just a minute.
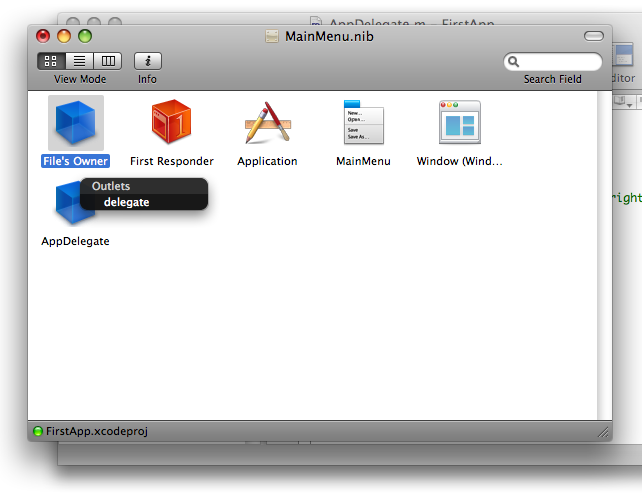
- Control-Click the File’s Owner object in the ‘MainMenu.nib’ window and drag it to the ‘AppDelegate’ object.

A pop-up list will display. Select delegate.

Design The User Interface
Now you simply need to add the controls to the main window in Interface Builder and then we can connect the action and outlet accordingly. To finish the interface, complete the following steps:
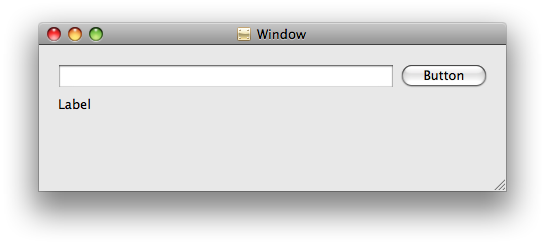
- Drag a TextField, a Label, and a Button to the main window so that the user interface looks like the screenshot below:
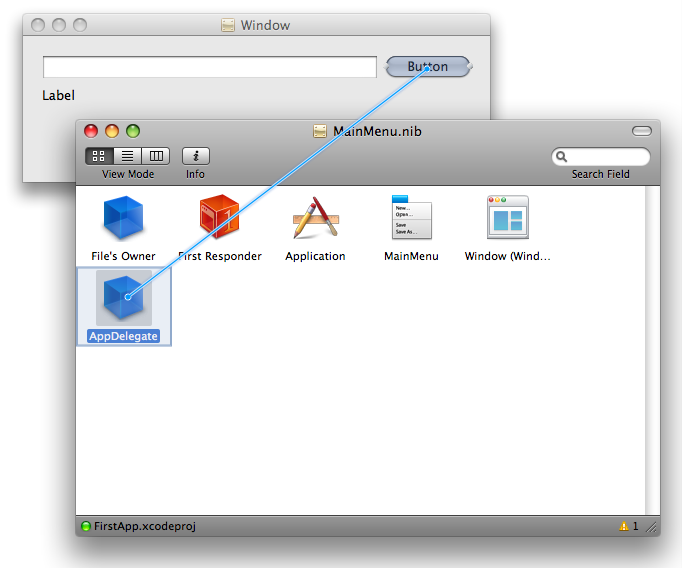
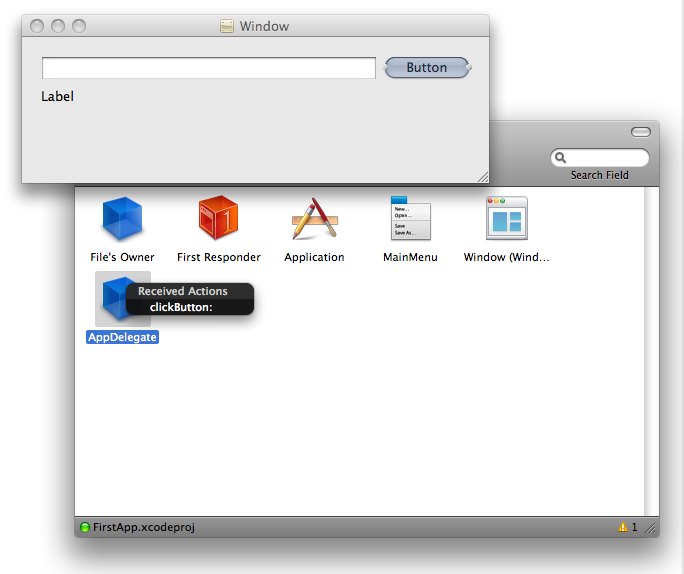
- Control-Click and drag from the Buttonto your ‘AppDelegate’ object in the ‘MainMenu.nib’ window.

A pop-up will display. Select clickButton:

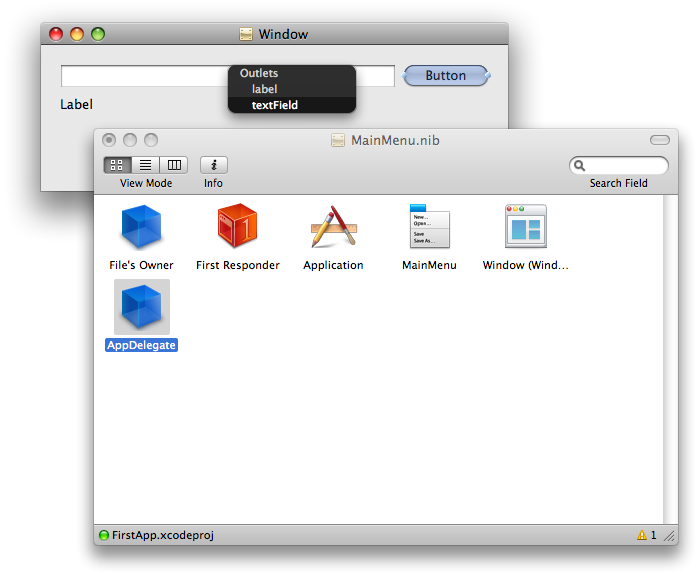
- Control-Click the ‘AppDelegate’ object and drag it to the text field in the main form.

A pop-up will display. Select textField

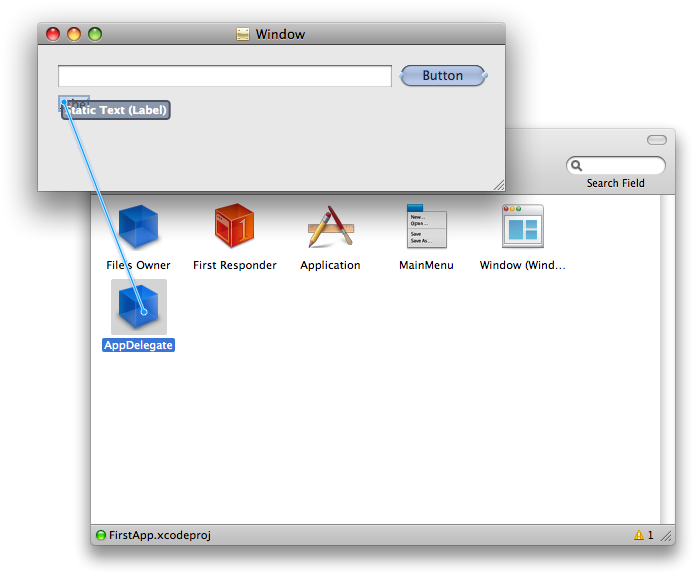
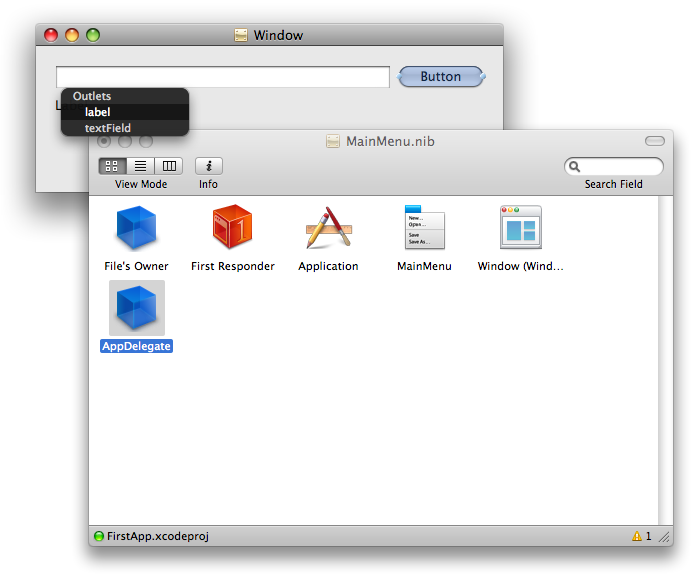
- Control-Click the ‘AppDelegate’ object and drag it to the label in the main form.

A pop-up will display. Select label


That’s it for Interface Builder. You can quit interface builder and return to XCode. We have one more piece of code to add and then our application will be finished.
Finishing Up
When the button is clicked, it will simply grab the text from the text field and place it into the label. That’s all the application does. Here’s the code you need. Just make your implementation in the ‘AppDelegate.m’ file look like this:
@implementation AppDelegate

- (void)clickButton:(id)sender;
{
	NSString *text = [textField stringValue];
	[label setStringValue:text];
}

@end
Now all you need to do is click “Build and Go”. When the application runs, type some text into the text field and click the button. You will see the label update with the text from the text field.
When I originally tried to build this application, I had to get Marcus’ help. Then he showed me a great way to have the label update in real time as you type text into the text field. It was accomplished using the new @synthesize method in Objective-C 2.0. I won’t go into the details of that now, but needless to say there are a lot of different ways to achieve what you want for your app.
Further Discussion
It has been most helpful for me while learning to write code for the Mac that from an interface standpoint, there are two entities that you need to be concerned with–actions and outlets. Outlets are normally UI controls such as text fields, list boxes, and buttons while actions are, well, actions–the action you want to happen when some event from a control is triggered.
If you connect all of your outlets to their declarations in your controller/delegate code implementation, you don’t have to do any control object instantiation in code. There may be times when this is desirable, however, most of the time you can just connect and go. Just use your controls as all of the instantiation/initialization is handled for you by the framework.
—
You can download the xCode project here: FirstApp Demo Application
Hey matey, thanks for taking the time to put this together, I’ve been struggling to get into OS X development using cocoa as I’m a java EE developer for my day job. This has really helped me break through the wall, cheers.
Glad it was helpful.
-Matt
In interface builder, I can’t change the name of the new object. I tried doing it without changing the name, and it worked fine. The problem is, when I tried to test the App. it came up with an error. I clicked on what the error was, and it says
error: There is no SDK at specified SDKROOT path ‘/Developer/SDKs/MacOSX10.5.sdk’
PLEASE HELP! Thanks in advance.
Henry
I did it all, except for changing the name of the Object, which I couldnt figure out how to do.
I get an error message when I try to build and go though. Says
error: There is no SDK at specified SDKROOT path ‘/Developer/SDKs/MacOSX10.5.sdk’
PLEASE HELP!
Thanks in advance,
Henry
Henry, it sounds to me like your SDK got deleted. Open the finder and navigate to /Developer/SDKs/ and see if the SDK ‘MacOSX10.5.sdk’ is in fact there. If not, then I suggest you just re-install the dev tools. Actually, you may try that either way. Let me know.
-Matt
Thanks alot for this, Hillegaas’s book is a bit hard to reconcile.
Oh Lord, Matthew. Thanks for this. I thought I was going fric*ing mad. I was wondering why all me ‘Hello World’ example programs didn’t work.
You made it clear Apple broke everything in Xcode3 – yea maybe with good reason, but where are all the help/tutorial updates in Xcode? These all relate to Xcode 2; they are still in there and *I* cannot find anything that relates to Xcode3 * the InterfaceBuilder changes in the tutorials.
I hope I’m wrong (please show me why!! ) but I fear not, This is criminal and demonstrates how Leopard & related tools have been rushed out unfinished. Thanks a lot iPhone.
Glad it helped, Geeklawyer. I agree that it seems most tutorials have not yet been updated. I just saw the other day that one of the Cocoa Dev Central tutorials has recently been updated, though. You can see it here: http://cocoadevcentral.com/d/learn_cocoa/
An outstanding introduction to programming applications. It was just what I needed to get started.
I’ve been having a weird issue, in step 3 of making connections, I get no outlets. So later when I try to connect the button to AppDelegate, it won’t let me. I’ve tried a few times and gone through the code but no luck. Any help? A link to a confirmed good .h file would be great.
Nender,
I’m not sure what problem you’re having, so I’ve uploaded my entire xCode project. You can download it here.
-Matt
Thanks a bunch Matt, that solved my problem.
Thanks for the intro!
I too was stymied from renaming the new object. I tried double-clicking the name (ding), using the Finder trick of pressing return (ding), control-clicking the name (no ding, but no rename option), checking the menus — nothing. I even tried searching via Help, but it found only the Finder rename.
Finally, what worked was first selecting the object (it was already selected after dragging it over, but by now I’ve clicked all over creation), then clicking ONCE on the name and waiting (oh so patiently) for a second or two.
Do you know any way of avoiding that second-or-two delay?
Thanks again for taking the time to write this up, Matt!
@Jag
I’ve looked for a quicker way and I’m pretty sure you’re stuck with the delay. I don’t think it’s even a full second, though. I click the icon. Then click the text and it’s editable within a second.
Best Regards.
-Matt
I simply can not seem to rename the new object.
“Finally, what worked was first selecting the object (it was already selected after dragging it over, but by now I’ve clicked all over creation), then clicking ONCE on the name and waiting (oh so patiently) for a second or two.”
The above does not work for me. I’m using Version 3.0 (629). Is this a bug?
Hey PATRICKPARKER
Not sure what the problem is. In IB, click once on the controller object you dragged into the Nib so that it is selected like this.
Wait a second and then click the text under the icon. Wait another second. It should become editable. If not, then I’m not sure. Try restarting IB and do the same thing again. Let me know how it goes.
-Matt
Finally! Thank you so much for this tutorial. I’ve been developing applications in Visual Studio for a while now but couldn’t figure out how to use XCode! Thanks again!
Hey John. Glad it was helpful.
-Matt