Scott Stevenson on Writing Copy For Product Pages

Scott Stevenson, webmaster and author for his Cocoa development site Cocoa Dev Central and weblog Theocacao, has written a new post on writing copy for product pages. The ‘keep it simple’ meme is the gist, but read what he has to say.

This is quite interesting to me as I have a product release that is imminent. Well, maybe not imminent. The code is almost done. Now I need to write some copy, figure out the PayPal IPN, incorporate Sparkle… etc. etc. Ok. Nevermind. It’s not imminent.

Anyhow, thanks for the post Scott. This is good stuff.

Core Animation Tutorial: Dashboard Effect

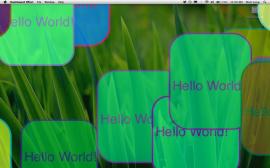
I just finished another Core Animation tutorial and posted it at CIMGF over the weekend. This was a pretty fun one. I wanted to duplicate the effect of the Dashboard widgets flying in and out from off screen and this is what I came up with. Take a look and let me know what you think. Core Animation Tutorial: Dashbaord Effect.

Core Animation Tutorial: Wizard Dialog with Transitions

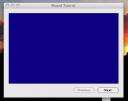
Wizard TutorialMarcus can really crank these articles out. His latest demonstrates how to create a Wizard interface with next and previous buttons, however, this is not your average every day Wizard interface. This one employs Core Animation. When you click the next or previous buttons, you’ll see that the next view slides in from the right or left depending on which you clicked. Take a look at his latest tutorial post: Core Animation Tutorial: Wizard Dialog with Transitions.

Core Animation Tutorial: Window Shake Effect

Marcus and I have started to have NSCoder Nights on Monday’s at Panera Bread on Powers near S. Carefree. We’ve been working to try to learn how to do certain OS X Leopard animation effects using Core Animation. The first challenge we took on was figuring out how to shake a window back and forth to indicate that the user has entered the wrong password in the login window. OS X does this when you try to login and enter your password incorrectly. If you’ve never seen it before, you either don’t have manual login enabled, or you’ve never entered your password incorrectly.

Anyhow, the article is short, but it has an XCode project that you can download and use. Take a look at the post, Core Animation Tutorial: Window Shake Effect and let me know what you think.

NSOperation Example

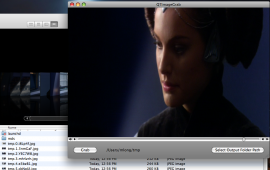
I just finished writing a new article for Cocoa Is My Girlfriend. I am building on the work Marcus did on his first article called Cocoa Tutorial: NSOperation and NSOperationQueue. In my article I’m taking a slightly more practical approach where I provide a flicker free method for grabbing images from a currently playing QuickTime movie. The NSOperation grabs the image data from the movie and saves it out to a folder in the filesystem specified by the user.

I think it is pretty cool. I hope it will help others see the power and flexibility of NSOperation and NSOperationQueue.

Read the new article, NSOpeartion Example, here.

Cocoa Tutorial: NSOperation and NSOperationQueue

I just finished helping Marcus post an article on our new site Cocoa Is My Girlfriend, a site dedicated to providing blog posts and tutorials on how to develop applications using Objective-C and Cocoa on the Macintosh.

This first post is on how to use the new threading objects found in Mac OS X Leopard (10.5) called NSOperation and NSOperationQueue. They provide a really simple and robust way to do multi-threaded programming. Take a look at the post and let us know what you think.

Satisfaction Guaranteed

So I’ve been using the NetBeans IDE v6 to do some Java development. I’ve been pretty happy with it so far. It has a nice set of project templates. It allows you to run and test web apps directly and at $0 dollars you can’t beat the price.

I loaded the application today and here is what I was greeted with:
Bad Netbeans!

Now, I suppose you could make the case that since it’s a free application, I should be obliged to take their survey, but I don’t recall agreeing to that. Just like most people, I didn’t read the license agreement so maybe I did agree to it, but what’s funny is that they want me to express my satisfaction with an application that has, for the first time since I started using it mind you, done that which is one of the most likely ways to cause dissatisfaction. They gave me two options and neither of them are useful to me.

Netbeans is cross-platform which means you’re going to have some hold-over ideas from other platforms, namely Windows. Since I work on a Mac, this also seemed very unfamiliar. Mac apps don’t bother you with stupid dialog boxes (that often) and when they do, they normally give you a way out. This dialog does not.

Call me crazy, but I don’t think a third option that says “No thanks. I don’t ever want to take a survey”, or even simply “Cancel” would suffice for the moment. That’s basically what “Remind Later” does, but when labeled that way, I realize that I should deal with this in a permanent way in order to be left alone, but the only permanent way is to choose the other option, “Go To Survey”. Now, I realize I don’t have to take the survey once I’m at the site, however, I am now less satisfied with the application because it is bugging me to take a survey and tell the company that I’m not satisfied because they bugged me about taking a survey. (I’m dizzy now) So I’m going to clue them in without taking the survey. Hello, Netbeans people. Yes. Here’s one way to guarantee my satisfaction–leave me alone!!

So this is just a rant and me complaining. It’s not that big a deal, but I would take this opportunity to say that if you are a new Mac developer coming from the Windows world where forcing users into choices they don’t want is the order of the day, just get over that notion now. Don’t start building Mac apps that do this. Please. It doesn’t help anyone. I think Mac users are generally happier people. I think it’s because their apps are unobtrusive. Leave your users alone. They’ll let you know if you need to fix or change something.

Update: Just got contacted by Gregg Sporar who works for Sun (see the comments). He says this has been fixed in Netbeans 6.1. Cool!

Cocoa/Objective-C FTP Library/Framework

Why is this so hard to find on the web? I did a search for an FTP library on google that would work in Cocoa and found nothing. Then I asked Marcus if he knew of a good library and he simply said, “the ConnectionKit“.

Sure enough, I downloaded the code and built it (you’ll need to run the svn command on this page from Terminal.app to get the source. Then open Connection.xcodeproj in XCode and build). Then I incorporated it into a simple demo app and I was simply shocked. How can this amazing library be so difficult to find on the web. It is incredibly powerful and stable!! It makes it simple to create your own FTP client application in no time.

What’s also cool about it is that it it doesn’t stop with just FTP. It supports numerous network connection protocols including FTP, FTP over SSL, SFTP (secure FTP), .mac, WebDAV, secure WebDAV, Amazon S3, NNTP, and HTTP.

I personally only need it for its FTP capabilities, so my demo app only does FTP, but you can see how simple it is to use from the application and could easily apply any of the other protocols.

Get my demo application here: ConnectionTest.zip

Translate DOM Element In WebView To View Coordinates

I set out to figure out how to translate a DOM element in the WebView to a rectangle on the screen. I wanted to display visual cues when clicking on the web page that highlight the DOM element that was clicked.

After about a week of searching, it turns out the answer is pretty simple. The WebView provides a method called elementAtPoint() which takes an NSPoint as it’s parameter. You simply need to intercept a mouse click event and obtain its locationInWindow and pass that to elementAtPoint which will return you an NSDictionary containing several objects. The object you’re interested in can be obtained by calling objectForKey on the NSDictionary passing it the key @”WebElementDOMNode”. Check to see that the object exists and then you can use it. I simply set the returned object to a DOMNode object which contains within it the magic variable called boundingBox. You now have your rectangle and know exactly where on the view the DOM element you clicked is being displayed. Here is some code to demonstrate:

// Inside your mouse click event handler
NSPoint point = [theEvent locationInWindow];
NSDictionary *dict = [webView elementAtPoint:point];
			
DOMNode *node = [dict objectForKey:@"WebElementDOMNode"];

// Make sure the node is not nil
if( node )
{
	NSRect rect = [node boundingBox];
	int left = rect.origin.x;
	int top = rect.origin.y;
	int width = rect.size.width;
	int height = rect.size.height;

	// Do something with the coordinates
	// ...
}

At that point you can do what you would like. I want to draw an overlay rectangle to highlight the DOM element on the screen, but from what I understand, drawing over the WebView may be a bit of a challenge. I’ve experimented with just adding another div with absolute positioning to the DOMDocument to act as my rectangle overlay, but I’ve had some issues with it. I’ll keep you posted here on my progress.

Also, you should probably know that in order to intercept a mouse click when you have a WebView in your window, you’ll have to subclass NSWindow and override - (void)sendEvent:(NSEvent *)theEvent and filter for left mouse clicks. Let me know if you need a further explanation.

XCode 3.0 Tutorial


I’ve seen numerous posts on different discussion boards posted by new Mac users wanting to learn to write code for the Mac. The main complaint is that Interface Builder is too different from the existing documentation, including Aaron Hillegass’s excellent Cocoa Programming for Mac OS X (which actually remains very relevant, by the way. You can wait for some updated books to come out, but Aaron’s book still provides a lot of concepts and even methods that apply. You just need to know what’s changed in XCode 3 and Objective-C 2). So, I’m going to do a quick tutorial here. FULL DISCLOSURE: I learned this from Marcus Zarra, so credit where credit is due. ;-)

Here are some points that you should keep in mind before moving ahead:

  • Don’t use Interface Builder to generate code. Create your code in XCode and let Interface Builder work with it. This isn’t absolutely necessary, but as Marcus told me, it’s just easier to get in this habit as the XCode 2 method of creating your controller, instantiating it, and generating your code files from Interface Builder simply isn’t available in the same way in XCode 3.0. I’ve come to see what Marcus is saying. It makes sense, but you’ll have to get into the process yourself to fully understand it. We’ll get to that in a minute.
  • Understanding Cocoa programming is much simpler if you learn MVC. You can probably step through code examples and figure some things out without learning MVC (Model, View, Controller), but I wouldn’t recommend it. Go Google it and read up on it.I will say as an introduction to it for those who are not familiar that it should probably be called (Model <–> Controller <–> View) or (View <–> Controller <–> Model) as the controller always sits between the other two. Your controller is either telling your model to update its data or it is telling the view to update its display. That’s the crux of the whole paradigm. The details run much deeper, but that’s how I would nutshell it for you.

Create Your Application

Let’s get started. Create a Cocoa Application using the following steps:

  1. Select File > New Project… and choose Cocoa Application in the ensuing dialog. Click Next
  2. Enter ‘FirstApp’ as the project name. Click Finish

You should see a project workspace like the following:
FirstApp Workspace

The next thing you should do is create a class to act as your controller or delegate.

Delegate == Controller

The words delegate and controller can be used synonymously. You’ll see later that we delegate the work of the different controls we create in Interface Builder to a delegate or controller class. This should all make perfect sense momentarily. First, create your controller/delegate class using the following steps:

  1. Option-Click on the Classes folder in your workspace and select ‘Add File…’
    Add File
  2. Choose Object-C Class in the ensuing dialog and click Next
    New File Dialog
  3. Name the file ‘AppDelegate.m’ and click Finish
    New Objectiv-C Class
  4. A new code window will display with your ‘AppDelegate’ interface code (.h file). Add an outlet for a text field and a label, and an action to the code so that it looks like this:
    @interface AppDelegate : NSObject {
    	IBOutlet NSTextField *textField;
    	IBOutlet NSTextField *label;
    }
    - (IBAction)clickButton:(id)sender;
    @end
    
  5. Now switch over to your implementation file for ‘AppDelegate’ (.m file). Add the clickButton implementation code so that the file looks like this:
    @implementation AppDelegate
    
    - (void)clickButton:(id)sender;
    {
    	
    }
    
    @end
    

    We will actually add some code to do something in the clickButton handler, but first we need to hook it up to the user interface in Interface Builder.

Interface Builder And Controller/Delegate Implementation

Now that you’ve specified the outlets–two NSTextFields, one a text field and one a label in this case–and an action called clickButton, you will see these items available for connecting to the UI in Interface builder. Let’s open Interface Builder and make the connections we need using the following steps:

  1. In your XCode workspace, expand the folder in the tree view called NIB Files and double click the file called ‘MainMenu.nib’. This will open the nib file in Interface Builder
    Select NIB File in Workspace
  2. Once Interface Builder loads select the NSObject item and drag it into the ‘MainMenu.nib’ window.
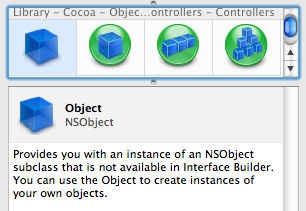
    Add NSObject
    Then rename it to ‘AppDelegate’
    Interface Builder AppDelegate

Making Connections (Pay Attention Here)

These next two steps are critical for your understanding. You now need to tell Interface Builder the following:

  • What object you want to use as a File’s Owner. You will delegate actions to a delegate/controller object. You tell the application which object to use by setting the File’s Owner delegate.
  • What type of object this delegate is. Before you can specify which object to use as the File’s Owner you have to set the object type. A regular NSObject doesn’t provide any implementation for your app. You need to tell Interface Builder that you want your NSOBject to actually be an object of type ‘AppDelegate’.

You can achieve this by completing the following steps:

  1. If you haven’t already, open the Inspector in Interface Builder by selecting Tools > Inspector
  2. Click on your NSObject that you named ‘AppDelegate’ and then click on the Identity tab in the inspector.
  3. Change the class to type ‘AppDelegate’ which will be available in Interface Builder as it has been able to obtain the class information from XCode.
    Set Delegate Class

    You should also notice at this point in the Class Actions and Class Outlets sections of the Inspector, your action, clickButton: and your outlet, the NSTextField are now visible. We’ll hook those up in just a minute.

  4. Control-Click the File’s Owner object in the ‘MainMenu.nib’ window and drag it to the ‘AppDelegate’ object.
    Set File's Owner

    A pop-up list will display. Select delegate.
    Set File's Owner Delegate

Design The User Interface

Now you simply need to add the controls to the main window in Interface Builder and then we can connect the action and outlet accordingly. To finish the interface, complete the following steps:

  1. Drag a TextField, a Label, and a Button to the main window so that the user interface looks like the screenshot below:
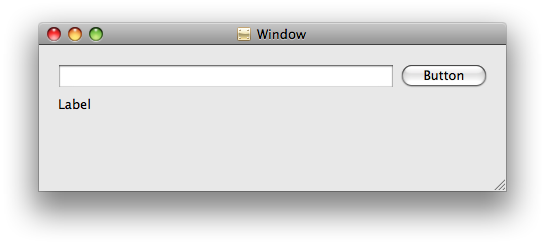
    Application Main Window Design
  2. Control-Click and drag from the Buttonto your ‘AppDelegate’ object in the ‘MainMenu.nib’ window.
    Set Button Delegate
    A pop-up will display. Select clickButton:
    Set Button Action
  3. Control-Click the ‘AppDelegate’ object and drag it to the text field in the main form.
    Connect Text Field
    A pop-up will display. Select textField
    Select Text Field
  4. Control-Click the ‘AppDelegate’ object and drag it to the label in the main form.
    Connect Label

    A pop-up will display. Select label
    Select Label

That’s it for Interface Builder. You can quit interface builder and return to XCode. We have one more piece of code to add and then our application will be finished.

Finishing Up

When the button is clicked, it will simply grab the text from the text field and place it into the label. That’s all the application does. Here’s the code you need. Just make your implementation in the ‘AppDelegate.m’ file look like this:

@implementation AppDelegate

- (void)clickButton:(id)sender;
{
	NSString *text = [textField stringValue];
	[label setStringValue:text];
}

@end

Now all you need to do is click “Build and Go”. When the application runs, type some text into the text field and click the button. You will see the label update with the text from the text field.

When I originally tried to build this application, I had to get Marcus’ help. Then he showed me a great way to have the label update in real time as you type text into the text field. It was accomplished using the new @synthesize method in Objective-C 2.0. I won’t go into the details of that now, but needless to say there are a lot of different ways to achieve what you want for your app.

Further Discussion

It has been most helpful for me while learning to write code for the Mac that from an interface standpoint, there are two entities that you need to be concerned with–actions and outlets. Outlets are normally UI controls such as text fields, list boxes, and buttons while actions are, well, actions–the action you want to happen when some event from a control is triggered.

If you connect all of your outlets to their declarations in your controller/delegate code implementation, you don’t have to do any control object instantiation in code. There may be times when this is desirable, however, most of the time you can just connect and go. Just use your controls as all of the instantiation/initialization is handled for you by the framework.


You can download the xCode project here: FirstApp Demo Application