Back in December I purchased a new video camera–the High Definition Canon Vixia HF100. Naturally, I did a lot of research before purchasing it as I wasn’t very familiar with the AVCHD format–a high definition H.264 codec that is very efficient and is able to store a lot of video data using a minimal amount of memory. The codec does this by only recording changes in the images rather than full frames. I don’t know the intricate details of the technology, however, it is quite impressive how good the quality is for such an inexpensive camera. You can see the quality this camera can produce by going to Vimeo.com and searching for the tag HF100. So if the video is so great at such a decent price, what’s the catch?
Simply put, the catch is that there are no applications available currently that can edit the AVCHD format natively on the Mac. The Canon camera, and other AVCHD cameras like it, create files that use the .mts file extension. Again, I’m not familiar with all of the technical details, however, I do know the only way to work with the files on the Macintosh is to convert them to some other format. iMovie 08/09 both handle the AVCHD format by importing the .mts files and converting them to the Apple Intermediate Codec (AIC).
iMovie provides several different options for importing the video data, however, if you decide to go with the “Full HD” option when importing, which I recommend if you want to have high quality output, your files will be GINORMOUS! Mine run in the neighborhood of about 1GB per minute of video. That’s huge!
Back in the days of tape, yes probably most people are still using tape, you could simply fill a tape with video and then put a date on it and add it to your physical media archive on a shelf somewhere. This works well as the shelf life for tape, while not infinite, is really quite good. This is exactly how I’ve done archiving in the past (and when I still use my old DV camera for various tasks). The question for me has become, how can I archive such massive amounts of data as efficiently and with some level of confidence that the data won’t get lost. Here are the the various issues I considered in coming up with my backup strategy:
- Hard Drive: This is a viable option for sure as disks keep getting cheaper, however, I have heard enough stories of failed hard drives that this one makes me a bit nervous. I can see using it as a secondary backup strategy, but I don’t trust hard drives enough. RAID seems like a reasonable solution, but that requires more money as you need redundancy which requires multiple disks.
- Burning AIC Format to DVD: This strategy would just be too much work. Remember that you can only hold 4.7GB on a single layer DVD-R/DVD+R. This means that you would be able to store less that 5 minutes of video on a single disk. While I worked hard to force myself to record short clips and keep things maintainable at the clip level, manually splitting all of the clips up in order to only get 5 minutes of video per disc seems just unmanageable.
- Burning AVCHD Format to DVD: The shelf life of optical media is also questionable, however, this is the strategy I am pursuing at the moment. Ideally solid state drives will get much bigger and cheaper at which point I will move everything over. For now, however, burning to DVD is the strategy I’m going to use
So I’ve decided that burning the original files to DVD is the best way to go for now as the shelf life of optical media is reasonable enough that my data should keep in the near term. And I’ve chosen to archive the video in its compressed AVCHD format. Here, however, is where the strategy gets interesting. I want to have a way to get the clips off of the DVD without too much hassle while using iMovie. Your strategy may differ if you use some other editing software. Here is what I mean.
iMovie automatically detects the existence of AVCHD movie clips when you either plug in your camera or mount the SD card with a card reader and loads the import utility. What I have done is taken the data from the SD card; copied it to my hard drive; and then made a disk image (.dmg) file out of it. When this disk image is mounted while iMovie is open, it will automatically detect that the image contains the AVCHD video files and load the import utility just as if it were physical media being mounted. Pretty cool eh? So, yes there is a bit of work on the front end, however, when you burn these disk images to a DVD, you can just mount them directly when you put the DVD in at some point in the future when you are ready to import and start working with the clips. So here are the steps you need to get this done.
- Plug in your camera or mount the SD card with a card reader. Then run iMovie
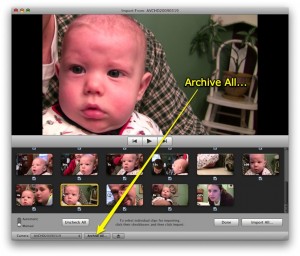
- When iMovie runs, it will automatically detect your camera or SD card and will load the import utility. Click the “Archive All…” button at the bottom of the window. Choose your Desktop as the save location (you’ll see why shortly) and give the file a name and iMovie will back up the data to your hard drive.

Archive All... - The backup process will take a little while depending upon how much data you are saving. Once it has finished, you need to open Terminal.app, which is located in /Applications/Utilities.
- Now we need to create the disk image and will do so using a command line utility called hdiutil. You need to change directories to your Desktop. To do so, at the command prompt in Terminal type cd Desktop and press Enter. You are now in the Desktop folder where we saved the archive.
-
To save the archive folder as a disk image, type the following command followed by the enter key: hdiutil create -srcdir ArchiveFolder AVCHDImage.dmg. This command will take a little while depending upon how much data your are archiving. You will know the process has finished when the command prompt returns. You should expect it to take a while if you are saving several gigabytes worth of data so be patient as the progress that hdiutil shows isn’t very informative. It is, however, working.
Note: ArchiveFolder is the name of the folder you saved when you had iMovie create the file on your Desktop. This command will not work if you specified spaces in your folder name. If you do use spaces, you will need to escape them. This means that if you created a folder called ‘Archive Folder’ for example, your command would need to be: hdiutil create -srcdir Archive\ Folder AVCHDImage.dmg. Notice the backslash before the space. Add this backslash before any spaces in your archive folder’s name.
- Once hdiutil has finished creating the disk image, you can now burn it to a DVD. Insert a blank DVD and open a new burn folder on the desktop or somewhere handy. Then drag the disk image to the burn folder and click burn.
- Once your burn is finished, insert the DVD back into your drive (if it was ejected) and let it mount on the desktop. Open the disk and double click the .dmg file. This will mount the image. You can click Skip during the verification process if you want to have it simply mount without verification. I usually skip it myself as I’m impatient.
- Open iMovie again. iMovie should detect the disk image and automatically load the import utility. If it doesn’t then you may have done something wrong. Shoot me specific questions in the comments if you need help here.
There is one caveat I should mention to using this technique. I suggest you keep your data size on your SD card to 4GB or so. In fact I use a 4GB card for precisely this reason–it fits well with my backup-to-DVD strategy since a single layer DVD only holds 4.7GB. If you have a hard drive based camera, you’ll have to keep an eye on the size of the data in order to ensure that your data will fit on a single DVD, but this shouldn’t be too difficult. I have a 16GB SD card for those cases where I need to capture longer shots like when capturing a long presentation, but most of what I do allows me to keep smaller files and therefore reasonable backup sizes.
So that’s it. It’s not a perfect strategy as the shelf life for DVDs is a little disconcerting, however, I have every confidence that solid state memory as it becomes more and more ubiquitous will be the best backup/archival methodology once the drives get bigger and the costs continue to go down. In the mean time, this strategy seems to be the best one for backing AVCHD video. If you have other strategies that have worked for you, share them in the comments. I would love to hear your ideas.
Good luck.

