![]() I’ve been waiting to upgrade the memory in my MacBook Pro, but hadn’t–until this week. Other World Computing has this deal going on right now where you can get the 4GB upgrade for $92.50. If you send in your old memory chips after the upgrade, you can take up to an additional $20 off. After it’s all said and done, this will cost me $72.50 for a 4GB upgrade. That’s a pretty good deal.
I’ve been waiting to upgrade the memory in my MacBook Pro, but hadn’t–until this week. Other World Computing has this deal going on right now where you can get the 4GB upgrade for $92.50. If you send in your old memory chips after the upgrade, you can take up to an additional $20 off. After it’s all said and done, this will cost me $72.50 for a 4GB upgrade. That’s a pretty good deal.
Category: Apple Computer
Twitter: The Long Tail of Celebrity?
If you’re not familiar with Chris Anderson’s The Long Tail, you should take a look at his book or at least read the about page on his site to understand this post. In a nutshell from Chris’s site:
The theory of the Long Tail is that our culture and economy is increasingly shifting away from a focus on a relatively small number of “hits” (mainstream products and markets) at the head of the demand curve and toward a huge number of niches in the tail.
In an attempt to explain what Twitter is to those who are not familiar, I’ve said that it is the long tail of celebrity. Ok, so that is probably pretty dumb since now I also have to also explain what the long tail is. I probably need to keep searching for a better definition, but when I say that it’s the long tail of celebrity, I simply mean that everyone who uses Twitter can be a celebrity…
to a certain extent.
Once you have followers on Twitter, you could be considered a celebrity of sorts. You’re not one of the big names, the hits, but you could certainly be considered a niche–especially in the case where your followers are only friends or family.
Thanks to Marcus I have started to follow some independent software developers for the Mac on Twitter and find many of their tweets (Twitter posts/updates) to be interesting. There’s lots of noise too, but you can quickly filter through that. What I’ve learned from following these guys is just the sheer amount of time these guys seem to spend coding. I know that’s what it takes to be successful as an indie, but it’s just fascinating to me to watch these guys update what’s new in their development processes.
To me, guys like Wil Shipley, creator of the award winning Delicious Library and Daniel Jalkut, developer of MarsEdit are celebrities of sorts. I don’t know Wil or Daniel personally and they don’t know me from Adam, but Twitter has enabled me to see what’s going on with the most recent developments in the latest version of each of the applications they develop and maintain. It’s highly interesting to me.
I see them as successful at doing that which I would personally like to do as well. I’m not star struck by these guys as tends to be the case when people are fascinated with Hollywood celebs, however, there is certainly an element of admiration as they are the real deal in independent Mac OS X development. They actually have applications available for purchase and are living the dream.
If my theory is right, then everyone can be a celebrity by using Twitter. Just don’t go taking yourself too seriously, throwing public tantrums, and getting caught driving drunk like the regular celebrities do every time your followers number rises. Remember, you’re still in the long tail–you’re a niche, not a hit.
You can catch me on Twitter at http://twitter.com/perlmunger. It’s not terribly interesting, but if you follow me, I’ll be your celebrity.
Satisfaction Guaranteed
So I’ve been using the NetBeans IDE v6 to do some Java development. I’ve been pretty happy with it so far. It has a nice set of project templates. It allows you to run and test web apps directly and at $0 dollars you can’t beat the price.
I loaded the application today and here is what I was greeted with:
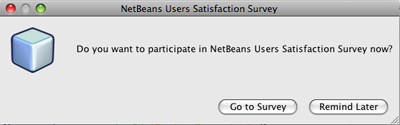
Now, I suppose you could make the case that since it’s a free application, I should be obliged to take their survey, but I don’t recall agreeing to that. Just like most people, I didn’t read the license agreement so maybe I did agree to it, but what’s funny is that they want me to express my satisfaction with an application that has, for the first time since I started using it mind you, done that which is one of the most likely ways to cause dissatisfaction. They gave me two options and neither of them are useful to me.
Netbeans is cross-platform which means you’re going to have some hold-over ideas from other platforms, namely Windows. Since I work on a Mac, this also seemed very unfamiliar. Mac apps don’t bother you with stupid dialog boxes (that often) and when they do, they normally give you a way out. This dialog does not.
Call me crazy, but I don’t think a third option that says “No thanks. I don’t ever want to take a survey”, or even simply “Cancel” would suffice for the moment. That’s basically what “Remind Later” does, but when labeled that way, I realize that I should deal with this in a permanent way in order to be left alone, but the only permanent way is to choose the other option, “Go To Survey”. Now, I realize I don’t have to take the survey once I’m at the site, however, I am now less satisfied with the application because it is bugging me to take a survey and tell the company that I’m not satisfied because they bugged me about taking a survey. (I’m dizzy now) So I’m going to clue them in without taking the survey. Hello, Netbeans people. Yes. Here’s one way to guarantee my satisfaction–leave me alone!!
So this is just a rant and me complaining. It’s not that big a deal, but I would take this opportunity to say that if you are a new Mac developer coming from the Windows world where forcing users into choices they don’t want is the order of the day, just get over that notion now. Don’t start building Mac apps that do this. Please. It doesn’t help anyone. I think Mac users are generally happier people. I think it’s because their apps are unobtrusive. Leave your users alone. They’ll let you know if you need to fix or change something.
Update: Just got contacted by Gregg Sporar who works for Sun (see the comments). He says this has been fixed in Netbeans 6.1. Cool!
Cocoa/Objective-C FTP Library/Framework
Why is this so hard to find on the web? I did a search for an FTP library on google that would work in Cocoa and found nothing. Then I asked Marcus if he knew of a good library and he simply said, “the ConnectionKit“.
Sure enough, I downloaded the code and built it (you’ll need to run the svn command on this page from Terminal.app to get the source. Then open Connection.xcodeproj in XCode and build). Then I incorporated it into a simple demo app and I was simply shocked. How can this amazing library be so difficult to find on the web. It is incredibly powerful and stable!! It makes it simple to create your own FTP client application in no time.
What’s also cool about it is that it it doesn’t stop with just FTP. It supports numerous network connection protocols including FTP, FTP over SSL, SFTP (secure FTP), .mac, WebDAV, secure WebDAV, Amazon S3, NNTP, and HTTP.
I personally only need it for its FTP capabilities, so my demo app only does FTP, but you can see how simple it is to use from the application and could easily apply any of the other protocols.
Get my demo application here: ConnectionTest.zip
Analysis of the $800 Hakintosh
Life Hacker posted an article called Build a Hackintosh Mac for Under $800 on Tuesday this week. It’s quite a work of art, in my opinion–not Jonathan Ive kind of art mind you, but a form of art for sure.
When Apple first released the developer version of Tiger when they announced moving to Intel hardware, I didn’t own a Mac, or more accurately I hadn’t bought a new one since college and then the last OS I had was OS 7.5 on a a Motorola 68040 processor. I always loved the Mac, even in the pre-OSX days, and I had been been wanting to get back to the platform ever since college, but alas I could never justify the cost since all my work has been done on Windows (until a few months ago when I finally got a MBP).
When I discovered that the developer version of Tiger was available on bit torrent back then, I downloaded it–bought a separate internal hard drive that I could swap out with my Windows XP drive in my Dell. I made my own hakintosh out of a Dell Inspiron 5150. I was amazed at how easy it was and it worked “out of the…. torrent?”.
But here’s the trouble (and all of these points are mentioned in the comments of the Hakintosh article) and this summarizes what I found in my own experience:
- I’ll get this one out of the way first. It’s illegal. The “patched” version is not legal. That’s why you have to go search bit torrent for it. If it were legal, people would just host it for you on their websites
- Any time you want to update to the latest software or hardware, you have to hack the updates to get them to work if you could get them to work at all.
- Certain hardware when plugged into the firewire or USB 2 ports would cause a kernel panic and crash the system. Maybe this is working on the Life Hacker Hakintosh, but this pretty much kept me from ever importing video or photos or connecting to audio hardware for GarageBand recording. In other words it completely eliminated any of the usefulness of the iLife suite
- If you build a system and then add a legitimate Leopard license ($129) and 20″ LCD screen ($180 +/- $30), you’re now up to $1160 (not counting Adam’s rebates on the Life Hacker Hakintosh).
At that point you’re close to the cost of the least expensive iMac. Given, you don’t get anywhere near the same specs as far as performance, but what will end up happening if you go this route is what happened to me–I got tired of fidgeting with trying to get updates to work and the computer was all but useless to me on the creative front since all my peripherals would crash the system. No home movies, no photo management, no music composition–no point to it.
I’m sure you will hear a number of people–true hackers–who will decry the point here as they have successfully gotten everything to work “just fine”. I write this, not for them, but for people like my friend who pointed the article out to me. He is competent enough with computers where he could get this system put together and probably have some decent initial results, but to maintain the system and to be ensured all his peripherals will work, he would be heart broken when I would tell him that he needs to mess around with kernel extensions and plist files. Blank stares, and probably tears, would abound.
The Hakintosh is a really fun project for hacker types. I enjoy it myself, however, it’s simply not practical for the average or even above average user to get a working system. For those who think that that they can get a cheap Mac system this way, please beware–you may be up to the challenge at first, but it will burn you out in the end and you, like most Windows Vista users, will end up installing Windows XP on your system and making it into a file server.
XCode 3.0 Tutorial
I’ve seen numerous posts on different discussion boards posted by new Mac users wanting to learn to write code for the Mac. The main complaint is that Interface Builder is too different from the existing documentation, including Aaron Hillegass’s excellent Cocoa Programming for Mac OS X (which actually remains very relevant, by the way. You can wait for some updated books to come out, but Aaron’s book still provides a lot of concepts and even methods that apply. You just need to know what’s changed in XCode 3 and Objective-C 2). So, I’m going to do a quick tutorial here. FULL DISCLOSURE: I learned this from Marcus Zarra, so credit where credit is due. ;-)
Here are some points that you should keep in mind before moving ahead:
- Don’t use Interface Builder to generate code. Create your code in XCode and let Interface Builder work with it. This isn’t absolutely necessary, but as Marcus told me, it’s just easier to get in this habit as the XCode 2 method of creating your controller, instantiating it, and generating your code files from Interface Builder simply isn’t available in the same way in XCode 3.0. I’ve come to see what Marcus is saying. It makes sense, but you’ll have to get into the process yourself to fully understand it. We’ll get to that in a minute.
- Understanding Cocoa programming is much simpler if you learn MVC. You can probably step through code examples and figure some things out without learning MVC (Model, View, Controller), but I wouldn’t recommend it. Go Google it and read up on it.I will say as an introduction to it for those who are not familiar that it should probably be called (Model <–> Controller <–> View) or (View <–> Controller <–> Model) as the controller always sits between the other two. Your controller is either telling your model to update its data or it is telling the view to update its display. That’s the crux of the whole paradigm. The details run much deeper, but that’s how I would nutshell it for you.
Create Your Application
Let’s get started. Create a Cocoa Application using the following steps:
- Select File > New Project… and choose Cocoa Application in the ensuing dialog. Click Next
- Enter ‘FirstApp’ as the project name. Click Finish
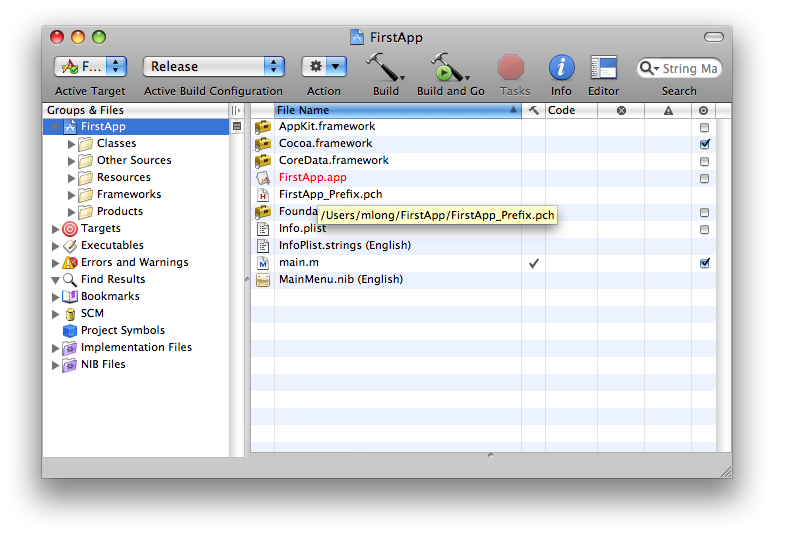
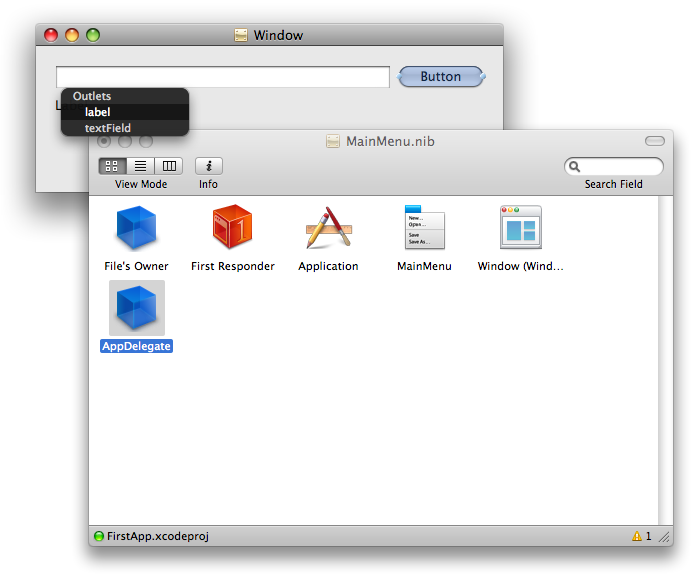
You should see a project workspace like the following:
The next thing you should do is create a class to act as your controller or delegate.
Delegate == Controller
The words delegate and controller can be used synonymously. You’ll see later that we delegate the work of the different controls we create in Interface Builder to a delegate or controller class. This should all make perfect sense momentarily. First, create your controller/delegate class using the following steps:
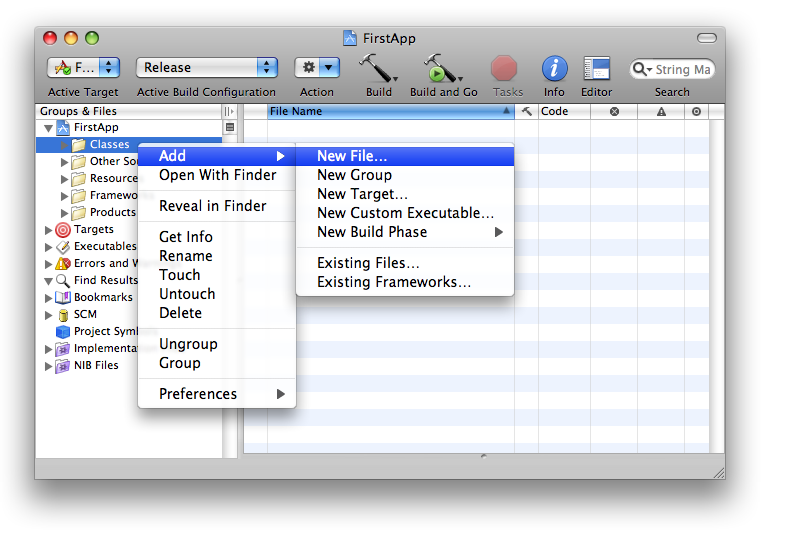
- Option-Click on the Classes folder in your workspace and select ‘Add File…’

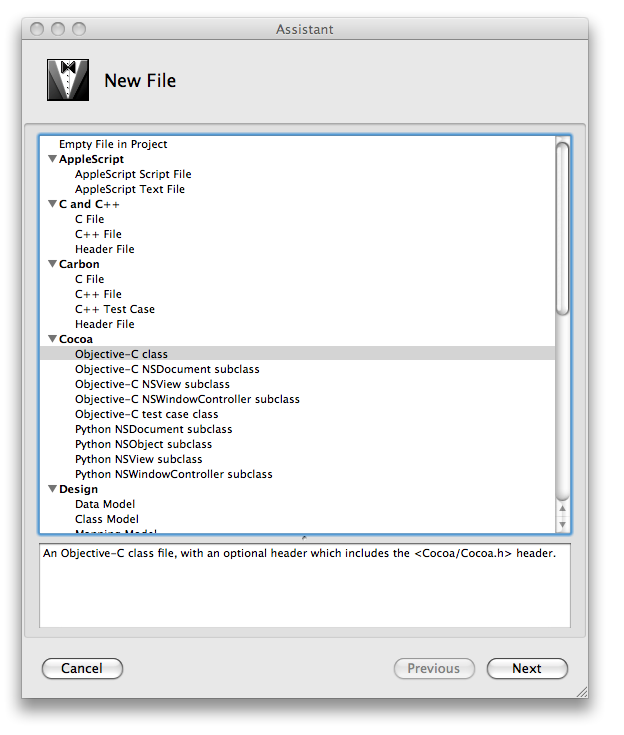
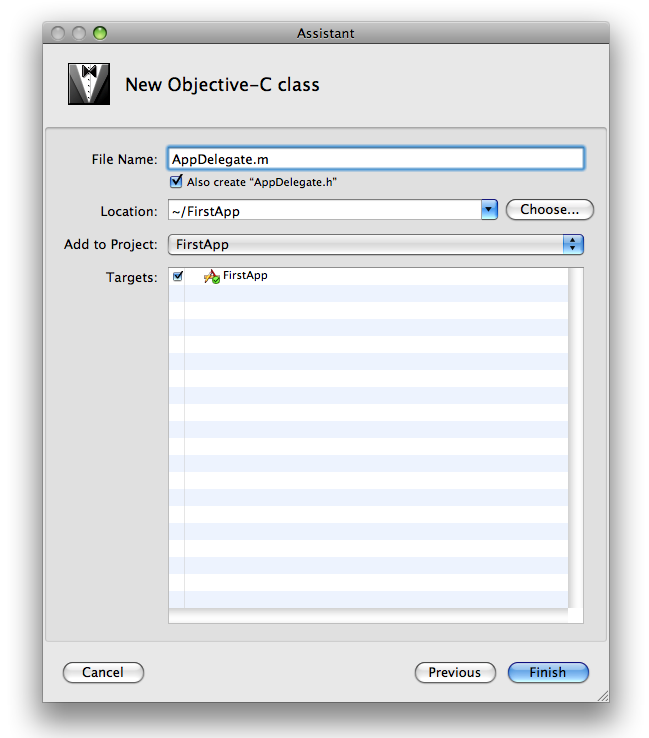
- Choose Object-C Class in the ensuing dialog and click Next

- Name the file ‘AppDelegate.m’ and click Finish

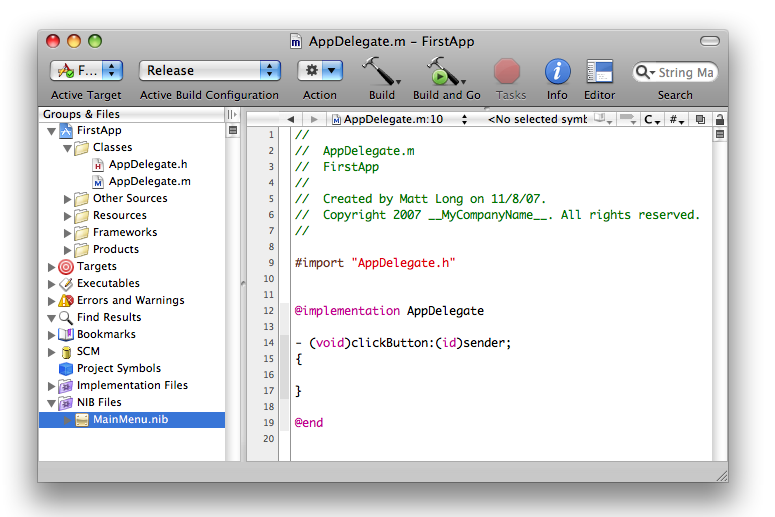
- A new code window will display with your ‘AppDelegate’ interface code (.h file). Add an outlet for a text field and a label, and an action to the code so that it looks like this:
@interface AppDelegate : NSObject { IBOutlet NSTextField *textField; IBOutlet NSTextField *label; } - (IBAction)clickButton:(id)sender; @end - Now switch over to your implementation file for ‘AppDelegate’ (.m file). Add the clickButton implementation code so that the file looks like this:
@implementation AppDelegate

- (void)clickButton:(id)sender;
{

}

@end
We will actually add some code to do something in the clickButton handler, but first we need to hook it up to the user interface in Interface Builder.
Interface Builder And Controller/Delegate Implementation
Now that you’ve specified the outlets–two NSTextFields, one a text field and one a label in this case–and an action called clickButton, you will see these items available for connecting to the UI in Interface builder. Let’s open Interface Builder and make the connections we need using the following steps:
- In your XCode workspace, expand the folder in the tree view called NIB Files and double click the file called ‘MainMenu.nib’. This will open the nib file in Interface Builder

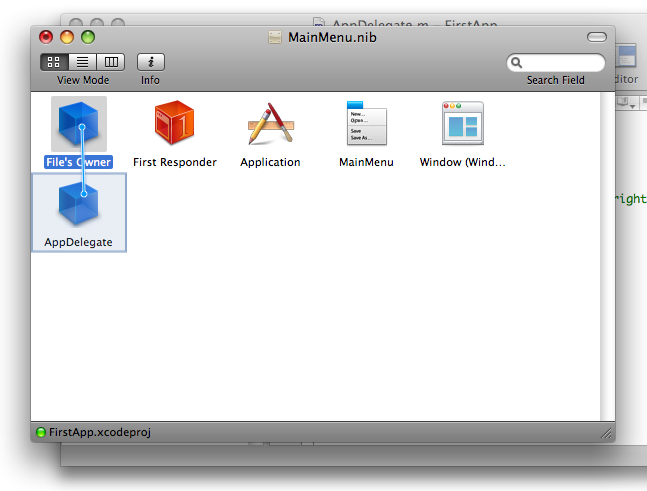
- Once Interface Builder loads select the NSObject item and drag it into the ‘MainMenu.nib’ window.
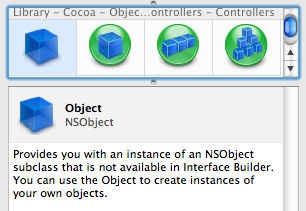
Then rename it to ‘AppDelegate’

Making Connections (Pay Attention Here)
These next two steps are critical for your understanding. You now need to tell Interface Builder the following:
- What object you want to use as a File’s Owner. You will delegate actions to a delegate/controller object. You tell the application which object to use by setting the File’s Owner delegate.
- What type of object this delegate is. Before you can specify which object to use as the File’s Owner you have to set the object type. A regular NSObject doesn’t provide any implementation for your app. You need to tell Interface Builder that you want your NSOBject to actually be an object of type ‘AppDelegate’.
You can achieve this by completing the following steps:
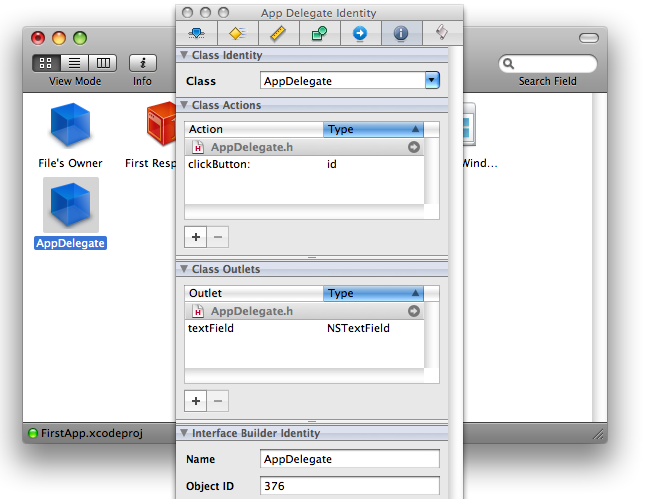
- If you haven’t already, open the Inspector in Interface Builder by selecting Tools > Inspector
- Click on your NSObject that you named ‘AppDelegate’ and then click on the Identity tab in the inspector.
- Change the class to type ‘AppDelegate’ which will be available in Interface Builder as it has been able to obtain the class information from XCode.

You should also notice at this point in the Class Actions and Class Outlets sections of the Inspector, your action, clickButton: and your outlet, the NSTextField are now visible. We’ll hook those up in just a minute.
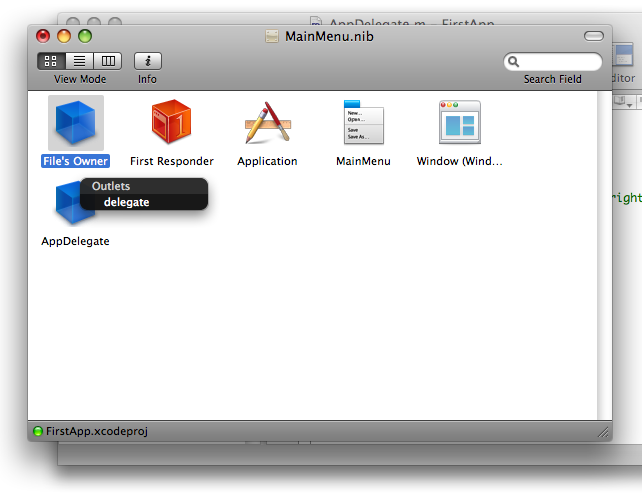
- Control-Click the File’s Owner object in the ‘MainMenu.nib’ window and drag it to the ‘AppDelegate’ object.

A pop-up list will display. Select delegate.

Design The User Interface
Now you simply need to add the controls to the main window in Interface Builder and then we can connect the action and outlet accordingly. To finish the interface, complete the following steps:
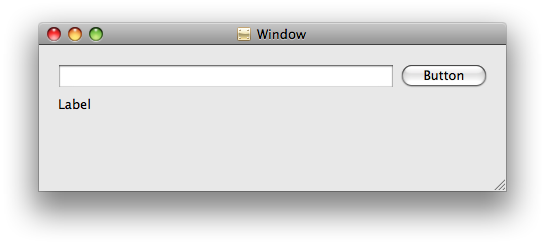
- Drag a TextField, a Label, and a Button to the main window so that the user interface looks like the screenshot below:
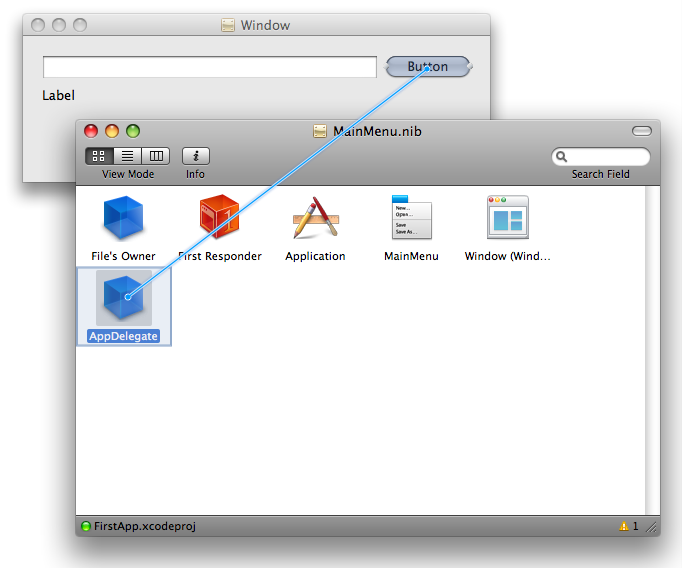
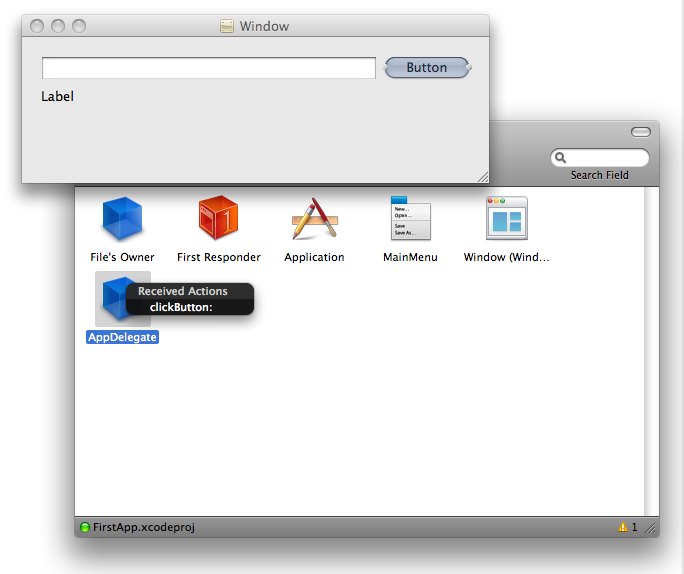
- Control-Click and drag from the Buttonto your ‘AppDelegate’ object in the ‘MainMenu.nib’ window.

A pop-up will display. Select clickButton:

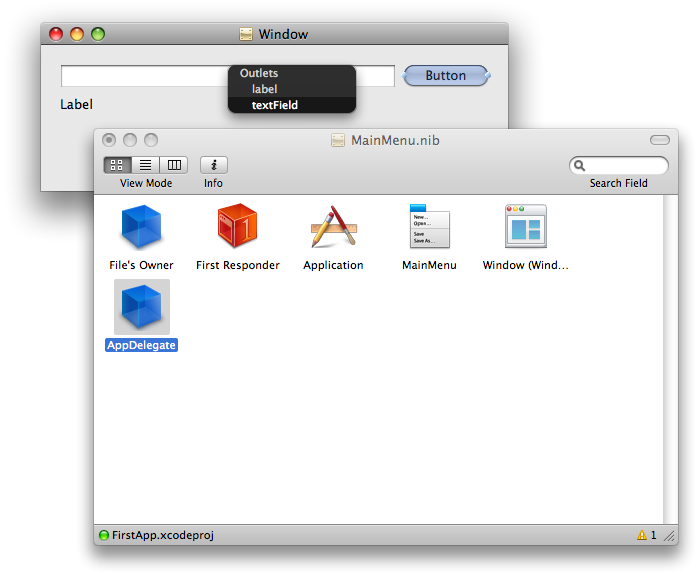
- Control-Click the ‘AppDelegate’ object and drag it to the text field in the main form.

A pop-up will display. Select textField

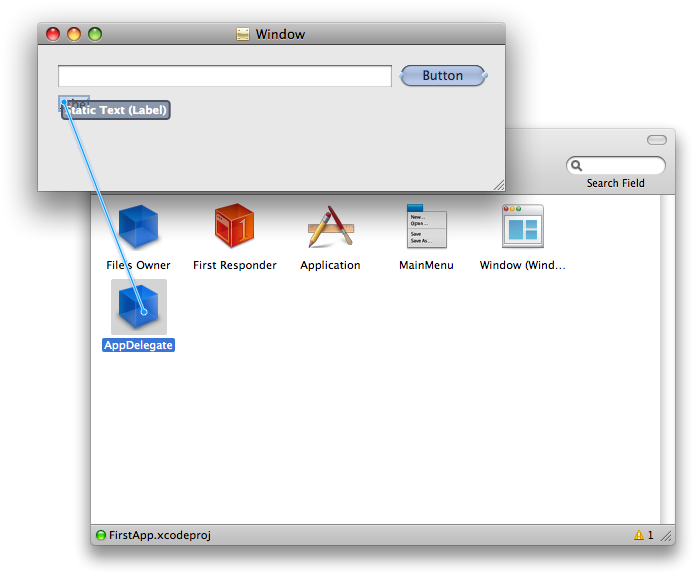
- Control-Click the ‘AppDelegate’ object and drag it to the label in the main form.

A pop-up will display. Select label


That’s it for Interface Builder. You can quit interface builder and return to XCode. We have one more piece of code to add and then our application will be finished.
Finishing Up
When the button is clicked, it will simply grab the text from the text field and place it into the label. That’s all the application does. Here’s the code you need. Just make your implementation in the ‘AppDelegate.m’ file look like this:
@implementation AppDelegate

- (void)clickButton:(id)sender;
{
	NSString *text = [textField stringValue];
	[label setStringValue:text];
}

@end
Now all you need to do is click “Build and Go”. When the application runs, type some text into the text field and click the button. You will see the label update with the text from the text field.
When I originally tried to build this application, I had to get Marcus’ help. Then he showed me a great way to have the label update in real time as you type text into the text field. It was accomplished using the new @synthesize method in Objective-C 2.0. I won’t go into the details of that now, but needless to say there are a lot of different ways to achieve what you want for your app.
Further Discussion
It has been most helpful for me while learning to write code for the Mac that from an interface standpoint, there are two entities that you need to be concerned with–actions and outlets. Outlets are normally UI controls such as text fields, list boxes, and buttons while actions are, well, actions–the action you want to happen when some event from a control is triggered.
If you connect all of your outlets to their declarations in your controller/delegate code implementation, you don’t have to do any control object instantiation in code. There may be times when this is desirable, however, most of the time you can just connect and go. Just use your controls as all of the instantiation/initialization is handled for you by the framework.
—
You can download the xCode project here: FirstApp Demo Application
Black Boxes and Core Data
Is Core Data a black box?
Reading this post from Theocacao this morning got me thinking about using Core Data in my first Mac app that I’m currently working on.
Five years working with .NET has taught me some valuable yet tough lessons–the black box approach to writing applications can seem like a perfect shortcut, but can quickly turn into the bane of one’s software development existence.
When I use the term black box, I am referring to employing a methodology (usually with data access) that is provided by the platform vendor (namely Microsoft, Apple, etc.) that are there to make the developer’s job faster and easier.
In theory, black boxes do what they are intended to do. In fact any and all of the examples and tutorial videos you might find on the Microsoft website show how to use these tools and they make it look very quick and easy.
I’ve found this to be true in the Core Data examples I’ve seen as well. What’s interesting is the fact that the data sets the examples work with are always very small. This matters a great deal and here’s why.
In the Microsoft world, you can build data models using a model designer that maintains XML code behind the scenes for you. You simply specify the query you want to use to obtain the data through a TableAdapter and then you are able to connect the model to your application without writing a stitch of code. It is “all done for you”. The problem is that it doesn’t scale well. After you’ve accumulated a large number of objects in the designer, the first thing you notice is that the interface becomes sluggish. It’s still useable, however, I know I’ve got a lot more that I need to add to the model before the app is going to be finished. It could get pretty ugly.
What’s worse and more critical to the application, however, is the unknown problems that the black box happily obscures from the developer’s view. I had developed my application using this black box model in Microsoft and had to change the database to a new empty database with the *exact same schema* and when I went to re-run the application, it just stopped working altogether. I could no longer add records to the database using the interface I had developed.
As I looked around the Internet, I found this to be a fairly common problem. I found myself having to frantically and immediately break out of the black box and return to square one–writing my own data access code–to get the app working again. It was a nightmare that taught me that I need to avoid the black boxes.
So, here I am now embarking on developing my Mac programming skills and the first thing I’m faced with is whether or not I should go the black box route that Core Data seems to be.
I say seems because I am new, so please don’t flame me over that comment. If it is not a black box methodology, simply explain to me how that is so. Meanwhile, I’m going to assume that it actually is a black box method and step into it very cautiously. I like Core Data quite well and it really seems to be pretty powerful. However, I can’t help but wonder about scalability and running into the same issues I had using Microsoft’s dev tools. I’ll continue to document my progress and findings here.
Is CamelBones Viable? An Outsider’s Perspective
CamelBones is a Perl-Cocoa/Objective-C bridge framework written by Sherm Pendley and it appears that is doesn’t yet work with OS X Leopard. I’ve written Sherm a couple of messages myself to find out if he has plans to update it for Leopard. I haven’t heard back from him yet, but according to some posts I read from back in May, Sherm may no longer want to pursue this project, or he just can’t afford to since he has been doing it on a volunteer basis. This is a shame to people like me who are just getting into the Cocoa/Objective-C game and would love to have access to Perl inside of my apps–yep, that’s right I want to access Perl from Objective-C.
I realize that you can do this using the PerlObjCBridge, but Sherm’s library is much more robust and, frankly, easier to use. In fact, just before I upgraded to Leopard I got version 1.0.3 of CamelBones working from within a Cocoa application in Tiger. I was stoked. I can now have all of the text parsing power of Perl from within my application and this, from my point of view is the real strength of CamelBones. You can imagine my disappointment when my application would no longer work when built in Leopard.
I suppose that’s the point of my post. Obviously I’m speaking without any evidence whatsoever that the majority of people who might use CamelBones would agree with me, but I really see CamelBones being more viable as an embedded Perl interpreter than anything.
If the examples that are included in the CamelBones distro are any indication, then the majority of people who use CamelBones are using it to be able to develop Cocoa apps from Perl. I submit that because Sherm has had trouble establishing viability using CamelBones in this way, maybe he ought to consider promoting it more from the perspective that those of us who still use and love Perl, would find it far more useful as a way to run perl scripts from within our Cocoa/Objective-C apps. Here is how I am planning to use it:
- To develop a plugin framework. New plugins developed as perl scripts could use known tokens to access the internals of my app and could therefore allow the app to evolve depending upon what I or others envision.
- To embed a powerful text parsing engine. Perl is best known for its ability to parse and process text. There are regular expression libraries available for Objective-C, however, to simply embed a Perl interpreter in your app provides a powerful regex engine that is already familiar if you know Perl compatible regular expression syntax.
If need be, I’ll find another way to get what I need in my applications (regex, plugin framework, etc.), however, Sherm’s CamelBones library is mature, solid, and very powerful. It would be ideal. I hope Sherm will continue to work on the project. Meanwhile, if you, like me, use Perl on a regular basis, let Sherm know that you would like to see the project continue–maybe make a donation (Click Donate) to help support its further development.
iCal Development Sample SimpleCalendar Doesn’t Work
I was wanting to learn the iCal API for the Mac so I downloaded the sample application called SimpleCalendar at the Apple Developer Connection website (you’ll need to log in with your ADC member account info). Apparently, when the sample code was last modified it was with code that didn’t make it into the release build of Leopard. The application will compile in xCode 3.0, but it won’t run properly (the calendar never displays).
To fix it, all you need to do is fix all of the warnings that come up when you do a compile. I’ve gone to the trouble of finding the correct API, so I figured I would highlight it here. The FileMerge results between my fixed version of Calendar.m (the offending file) and the original version show that there are four changes. They are as follows:
| Line No. | Original | Fixed |
|---|---|---|
| 74 | NSPredicate *eventsForThisYear = [NSPredicate eventPredicateWithStartDate:startDate endDate:endDate calendars:[[CalCalendarStore defaultCalendarStore] calendars]]; |
NSPredicate *eventsForThisYear = [CalCalendarStore eventPredicateWithStartDate:startDate endDate:endDate calendars:[[CalCalendarStore defaultCalendarStore] calendars]]; |
| 193 | NSPredicate *uidPredicate = [NSPredicate eventPredicateWithStartDate:startDate endDate:endDate UID:uid calendars:[[CalCalendarStore defaultCalendarStore] calendars]]; |
NSPredicate *uidPredicate = [CalCalendarStore eventPredicateWithStartDate:startDate endDate:endDate UID:uid calendars:[[CalCalendarStore defaultCalendarStore] calendars]]; |
| 240 | NSPredicate *uidPredicate = [NSPredicate eventPredicateWithStartDate:startDate endDate:endDate UID:uid calendars:[[CalCalendarStore defaultCalendarStore] calendars]]; |
NSPredicate *uidPredicate = [CalCalendarStore eventPredicateWithStartDate:startDate endDate:endDate UID:uid calendars:[[CalCalendarStore defaultCalendarStore] calendars]]; |
| 280 | [[CalCalendarStore defaultCalendarStore] saveEvent:object span:CalSpanThisEvent]; | [[CalCalendarStore defaultCalendarStore] saveEvent:object span:CalSpanThisEvent error:nil]; |
I’ve successfully built the application without any warnings or errors and it now will run. On to learning what the code is actually doing.
The managed object model version used to open the persistent store is incompatible with the one that was used to create the persistent store.
I’ve put the whole error message in the title of this post so that people can find the answer to this problem easier when looking on the web. The first Core Data application I built since starting to learn how to develop applications for Mac OS X Leopard threw me for a loop because I kept getting this error message when I would try to run the application:
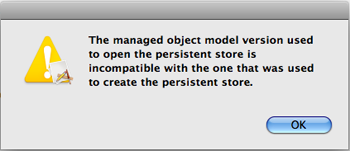
The managed object model version used to open the persistent store is incompatible with the one that was used to create the persistent store.
The problem would not happen as long as I hadn’t made any Core Data binding connections in interface builder, so I was puzzled. I looked around on the web for a while and couldn’t find any answers, so then I asked Marcus. He knew exactly what was wrong.
Apparently the Core Data applications create an XML file in which they store the data for your application in:
~/Library/Application Support/ApplicationName/ApplicationName.xml
where ~ means your home directory and ApplicationName and ApplicationName.xml are the name of your actual application.
All you have to do is delete that XML file and rebuild your app. It will then work fine as it regenerates the object model according to what is in XCode.
What happened was I had created a Core Data application and started trying to do things during which I screwed up completely and decided to scrap the whole project. I then went into the finder and deleted the application code directory completely and decided to start over. When I created the new Core Data application, I used the exact same name as the first project. So, now when I went to build the application, it went and looked in:
~/Library/Application Support/ApplicationName/ApplicationName.xml
and found the file there, so it tried to use it. Meanwhile, my data model had changed in the new project. The application didn’t know what to do with the incompatible model and then threw up its hands and gave me this error. Anyhow, it’s an interesting lesson and very helpful. Thanks to Marcus for providing the answer. Meanwhile, take a look at this code that is part of the default Core Data template:
[c]
– (NSString *)applicationSupportFolder {
NSArray *paths = NSSearchPathForDirectoriesInDomains(NSApplicationSupportDirectory, NSUserDomainMask, YES);
NSString *basePath = ([paths count] > 0) ? [paths objectAtIndex:0] : NSTemporaryDirectory();
return [basePath stringByAppendingPathComponent:@”ApplicationName”];
}
[/c]
This code is returning the path to the specific Application Support directory for your application.
Hope this helps.